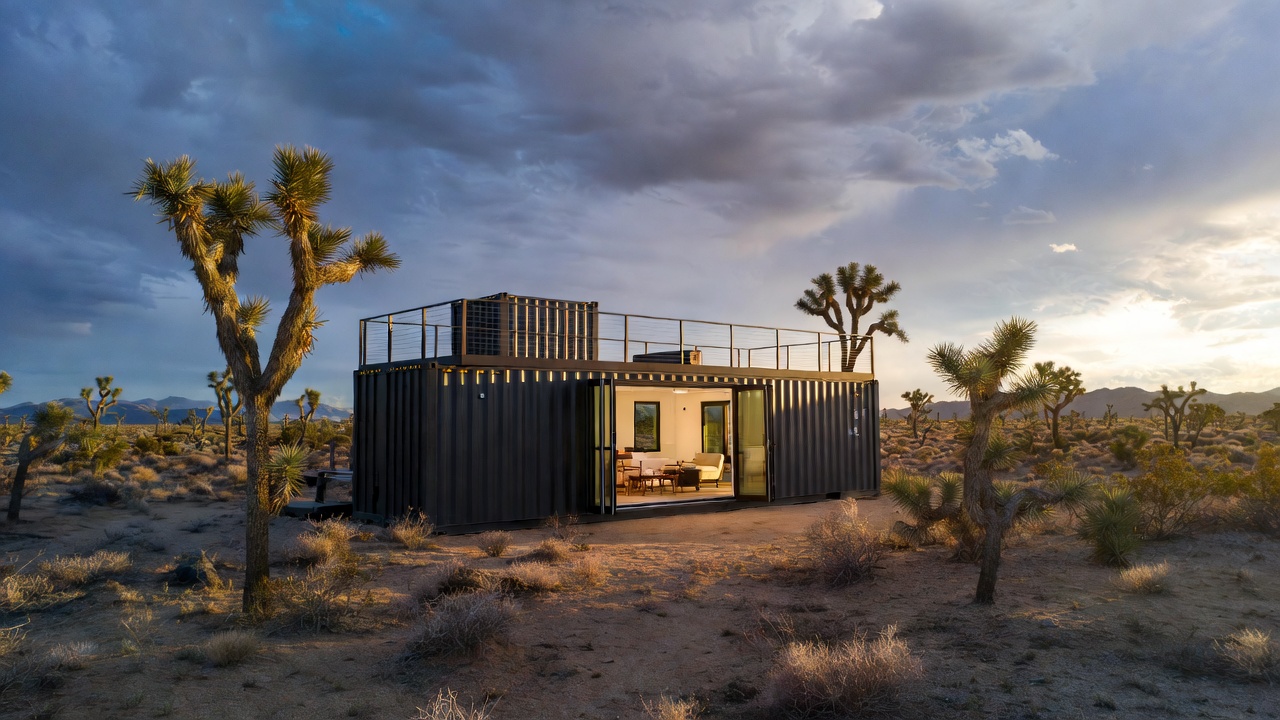
Ben Uyeda is an architect — Cornell B.Arch and M.Arch, co-founder of ZeroEnergy Design (named one of America's 50 best architecture firms by Architect Magazine), and creator of HomeMade Modern. When he decided to build a shipping container home in Joshua Tree, California, he didn't treat it as a DIY adventure. He pulled permits, hired structural engineers, used a licensed welder for earthquake anchoring, and documented every decision, mistake, product choice, and cost across eight full episodes published at themodernhomeproject.com.
The result is the most technically credible permitted container home build available anywhere online. Every detail in this case study comes directly from Ben's verbatim episode transcripts. Where he names a product, we name it. Where he gives a cost, we give it. Where he makes a mistake and explains how to fix it, we document both.
In this case study
- EP01 — Buying land and containers
- EP01 — Permits and foundation
- EP02 — Crane day, cutting, and framing
- EP03 — Doors and insulation
- EP04 — The desert septic solution
- EP05 — Utilities and HVAC
- EP06 — Paint, anchoring, and weatherproofing
- EP07 — Kitchen build
- EP08 — Bathroom build
- Rooftop deck — full guide
- Ben's 7 key lessons
- Full documented cost breakdown
▲ Full build compilation — The Modern Home Project (Ben Uyeda), published April 2026. Rooftop deck episode and full episode transcripts at themodernhomeproject.com. Cost data and analysis from ContainerCompass.
Buying Raw Land — and Why You Call the Utilities Yourself
Ben paid $20,000 cash for a 10-acre lot listed at $24,000 in Joshua Tree, California — negotiating down by pointing out that no survey had been done in the past 10 years. Before completing the deal, he verified two critical things independently:
- Electricity: He looked at Google Maps satellite view and could see utility poles running alongside the property. Then he called Southern California Edison directly to confirm electrical service was available at that specific address.
- Water: He called Joshua Basin Water District — not the real estate agent — to confirm water service availability for his specific APN (Assessor's Parcel Number). Their website allows this lookup by APN.
"Don't take the word from someone that's actually trying to sell the land. Go right to the suppliers. Find out from them. You will be on hold, it's kind of a pain, but just get that done and you'll have better information."
— Ben Uyeda, EP05
First action after purchase: A topographical survey and plot plan from a local surveying firm. Cost: $4,000. Primary purpose: establishing building setbacks — the legal boundaries within which the structure could be placed. Ben wanted the house close to the property line to minimize driveway length and utility connection costs.
Container sourcing — California's one-trip requirement
California requires documentation showing containers used for homes have not carried toxic or radioactive materials. This effectively mandates one-trip containers with appropriate certificates. Ben sourced through Container Discounts:
- 40-ft high-cube one-trip containers (×2)$4,800 each
- 20-ft high-cube one-trip container (×1)$3,250
High-cube was non-negotiable. After insulation and interior framing, a standard-height container delivers roughly 7–7'6" of finished ceiling height — potentially below IRC minimums for habitable rooms. A high-cube delivers 8'+ finished, which is comfortable and code-compliant.
Navigating San Bernardino County — The Permitted Build Process
Ben's approach to permits was methodical: he went in person to the San Bernardino County building department with the survey in hand and asked for a complete checklist of everything needed to permit a shipping container home. Then he worked through the list.
| Permit cost item | Cost | Notes |
|---|---|---|
| Topographical survey and plot plan | $4,000 | Local surveying firm; establishes setbacks |
| Architectural drawings | $5,000 | ZeroEnergy Design (Ben's own firm, paid full rate); drawing set sufficient for permitting; not full construction documents |
| Structural engineering drawings and stamp | Not specified | Separate firm; California stamp required since ZeroEnergy Design lacks CA license; calculations proving code compliance |
| Fire sprinkler system | $7,000+ | San Bernardino County mandates sprinklers in all residential buildings — "avoidable in states with less strict regulations" |
Ben's critical insight on structural engineering
"It's really not about this sort of common sense approach. It's really about what you can prove through calculations and more importantly, getting a licensed engineer to stamp the drawings. If you don't have that, it doesn't matter how smart you think you are — how clever of a detail you have or how overbuilt you think something is. You simply can't build it unless you can prove it through calculations."
"The one thing we don't need about shipping container houses is just more wild misinformation."
This is why Ben's interior two-by-four framing system, half-inch plywood sheathing, and heavy-duty anchor details may look excessive but are the code-compliant, engineer-stamped solution for a permitted build. Comments calling it "overbuilt" miss the point entirely.
Foundation decision: monolithic slab
Ben chose a monolithic slab over a pier/crawlspace foundation. The slab required careful pre-planning — drain pipes had to be stubbed through the concrete before the containers were placed, because there's no crawl space to run plumbing after the fact. Any pipe location change after the slab is poured is an expensive concrete saw job. He used #4 rebar and 2×8 lumber forms.
General contractor structure: Ben hired on a time-and-materials contract rather than a fixed-price contract — the appropriate choice for unconventional owner-involved projects. A fixed-price contract on an unusual build results in heavy contingency padding by the contractor, making it significantly more expensive.
Crane Day, Opening Cuts, and Why Containers Need Interior Framing
Crane day logistics
Containers were moved with fabric straps hooked to the corner castings. Key lesson: the 20-ft container is light enough that the crane can drive while the container is suspended. The 40-ft containers are too heavy — the crane must pick up, swing, reposition, and repeat, moving like an inchworm. Ben notes final positioning accuracy is achievable within about half an inch with three people pushing on corners.
Pre-plan your drain stub locations before the slab pours
One drain pipe had already been stubbed through Ben's concrete slab and had to be carefully protected during container placement. On a monolithic slab there is no access underneath after the fact — every drain location must be planned in the design stage, not improvised during construction.
Why interior framing is required — the answer most guides skip
Ben addresses the most common container home misconception directly:
"The problem isn't that these boxes aren't strong enough — it's where they get their strength. It's from these continuous corrugated panels. That strength is compromised when we cut into them... But the more important problem is that this steel is exposed to the outside and it's only about an eighth of an inch thick. If you're relying on exterior steel that's relatively thin for the structural support of the building, if someone doesn't maintain the paint and it starts to rust out, the whole building could collapse. You don't really want buildings that can have structural failures due to owner neglect."
— Ben Uyeda, EP02
His framing system: 2×4 interior stud walls with galvanized steel bracket double top plates and joist hanger ceiling support. Shear wall tie-down rod system for lateral load resistance.
Cutting openings — what actually works
Ben used a battery-powered angle grinder (charged via a Goal Zero power pack with solar panel) rather than a plasma cutter. His specific technique:
- Mark lines with a silver Sharpie using a level and a cardboard template — corrugations make straight lines without a guide nearly impossible
- Go slowly — the second window was significantly better than the first because he slowed down
- Pre-drill corner holes, bottom cut first, then sides, then top
- Do not run continuous weld beads — heat buildup deforms the corrugated metal. Limit to 2–3 inch welds every 6–8 inches
- Cut from inside where possible (light-colored interior shows Sharpie lines more clearly)
- The corrugated walls are under pressure — the material can jump or pinch the grinder blade unpredictably. Control the tool firmly throughout
Angle steel vs. tube steel for window frames — Ben's conclusion
Ben tried both and concluded definitively: angle steel is better than tube steel for container window and door frames. Tube steel has a radius on its corners that creates a gap at the wall junction; angle steel provides a positive stop, two weld seam locations, and a 3-inch overlap with the container wall for weatherproofing — none of which tube steel can provide.
Bi-Folding Doors and a Three-Layer Insulation System
The signature design move: parallel bi-folding doors
The most dramatic feature of the home is a pair of Jeld-Wen bi-folding doors installed parallel to each other on opposite ends of the 20-foot container — both walls can open simultaneously, creating a flow-through indoor-outdoor connection and cross-ventilation in the desert.
"The appeal of shipping container houses is in the boxiness and industrial detail. The design challenge is in making these narrow steel boxes feel alive and open without modifying them to the point that diminishes them structurally or aesthetically. Our strategy was to only have a few openings but to double down and maximize the impact by aligning the doors to create outdoor spaces that flow inside."
— Ben Uyeda / themodernhomeproject.com
Every door in the house is a glass patio door. "I just figured if I was going to take the time to cut an opening, I might as well be letting some light in." Plate steel overhangs were welded above south-facing doors for passive solar shading — intentionally sized shorter than optimal to allow real-time experimentation and measurement.
Insulation — achieved R-values
- Wall insulation (rigid board system)R-19 to R-21
- Floor insulation (subfloor system)R-46 total
- Roof insulation (rigid board system)R-48 total / R-26 continuous
Ben avoided professional spray foam in favor of DIY rigid insulation panels with Great Stuff spray foam for gaps. Two spray foam types used: fire-blocking formula at all door and window frame gaps before welding on steel trim (regular foam catches fire from welding sparks), and window/door formula elsewhere to prevent frame bending from expansion pressure.
Desert spray foam lesson — water is your friend
When spraying foam into large corner gaps, Ben created a mess that spread out of control. The cause: dry desert air slows spray foam cure, causing it to run before it sets. His fix: spray a little water with a spray bottle before applying foam. Humidity helps foam expand properly and cure faster. Prevention: stuff scraps of rigid insulation into large gaps first so the foam has structure to cling to rather than running freely.
The Above-Ground Planter Septic Solution — $8,000
The desert geology under Joshua Tree — solid rock 1–2 feet below the surface everywhere on the property — made a conventional leach field impossible. Percolation tests failed repeatedly. Over-excavation attempts failed. Ben worked with Action Pumping to design an unconventional solution the building department approved:
-
1
1,500-gallon concrete septic tank
Buried in a crane-placed excavation. Three-layer stratification inside: scum (grease and soap) floats to the top; sludge (solids) settles to the bottom; effluent (bacteria-laden water with nitrogen and phosphorus) in the middle layer — the only layer that exits the tank.
-
2
Four 1,000-gallon concrete planters at grade
$650 each from a local concrete supplier. Arranged in a row above grade. A submersible pump triggered by a floating buoy pumps effluent from the septic tank up to the planters. Volume control valves at each planter allow individual flow adjustment. An overflow pipe connects back to the septic tank if planters reach capacity.
-
3
Wildflower garden in the planters
Effluent fertilizes wildflower seeds planted in the planters. The nutrient content that would normally leach into the ground instead feeds the garden — a genuine closed-loop solution for the desert site.
The building department approved this system because it avoided the percolation test requirement entirely — the planters provide contained, above-grade treatment without relying on desert soil permeability. Total system cost: $8,000. Ben's honest caveat: "After about a month of light use, the system seems to be working really well, but that's way too short of a test period to fully endorse a system like this."
Grid-Tied Solar, Backup Power, and Mini-Split HVAC
Grid-tied vs. off-grid — Ben's reasoning
"When you're designing an off-the-grid house, you are in the sticky situation of: do I design towards the average and be cost efficient, or do I design towards the exception but then spend a lot of money? A grid-tied house lets you use the utility grid as a free battery. When you overproduce you sell back to the grid, and when you under produce you draw from the grid."
— Ben Uyeda, EP05
His installed solution: grid-tied as primary power, with a Goal Zero battery backup (Yeti lithium + lead-acid batteries + transfer switch) powering key circuits — refrigerator, WiFi, lights — during outages. Three 100-watt solar panels charge the Goal Zero system daily.
Utility connection costs: nearly as much as the land
Ben spent almost as much connecting the house to electricity and water as he paid for the 10-acre lot. This included: a new transformer on the utility pole; an extra support cable for the pole due to the added transformer weight; a conduit trench from pole to house; the electrical panel; Joshua Basin Water District water meter fee; excavation for water pipes; and a backflow protection device. Utility connection costs in rural areas are one of the most consistently underestimated line items in raw land builds.
HVAC — ductless mini-splits throughout
Ben chose ductless mini-split heat pumps for three specific reasons he states explicitly:
- No additional holes through structural metal required for ductwork
- No ceiling height loss from duct chases
- Avoids the 30%+ energy loss typical of ducted systems, especially when ducts run through unconditioned space
He used Mitsubishi ceiling-mounted units and recommends calling Home Depot Home Services (1-800-Home-Depot) for consultation — they send a team to measure spaces and specify appropriately sized units. He also installed Ecobee smart thermostats.
Exterior Paint, Earthquake Anchoring, and Gap Sealing
Paint system — specific products used
- Exterior paint
- PPG Timeless Exterior "Elegant Charcoal" flat/matte
- Interior paint
- PPG "Crystal Clear White" flat
- Primer (preferred)
- Rustoleum Rusty Metal Primer
- Caulk at all frame junctions
- GE Paintable Silicone
- Roof vent flashing
- Henry Stop Leak Roofing Spray
Ben tested two primers — Rustoleum self-etching (requires very clean, rust-free steel; more prep) and Rustoleum Rusty Metal Primer (just wire-brush obvious rust and wipe with mineral spirits; easier). He recommends the Rusty Metal Primer for equivalent results with significantly less prep work. Exterior painted by a professional with a spray system in a single day per coat.
Earthquake anchoring — San Bernardino County requirement
The structural engineer specified heavy-duty angle steel anchor assemblies for seismic shear resistance. Ben's documented process:
- ¾-inch thick steel angle pieces with 1-inch holes — 72 holes total drilled on a drill press (used 3 drill bits)
- Pieces welded to corner blocks by a certified structural welder (required by the building department for this specific work)
- 1¼-inch holes drilled 1 foot deep into the concrete at each anchor location
- Quick-Crete high-strength anchoring epoxy injected — compressive yield strength >10,000 PSI; pullout strength 28,000 lbs
- Threaded rods driven into the epoxy-filled holes; steel angles welded to container corner boxes after epoxy cured
Container-to-slab gap sealing
Container corner blocks contact the concrete; everything else floats approximately ¼ inch above the slab. Ben's sealing process: spray foam fills the gap (providing backing), excess trimmed flush, then Quick-Crete precision grout pushed in over the foam and finished with a masonry tool. "This isn't just to give it a nice finished look. This is also critical for keeping out little critters from hiding out underneath the container."
Galley Kitchen in 7 Feet — Product Choices and Design Logic
A 40-foot high-cube container, after insulation and interior framing, delivers just over 7 feet drywall-to-drywall in width. Ben designed a galley kitchen — all cooking on one wall, all pantry storage on the other — and his advice for this format is specific:
"In a small kitchen like this, I do recommend spending a little bit more to get high quality durable cabinets. The cost differential will be minimal because of the limited quantity and the concentration of use will be greater."
— Ben Uyeda, EP07
Specific products used: Thomasville cabinets (Home Depot); Silestone "White Zeus Extreme" 1¼-inch quartz countertop; HYER 24-inch electric range; under-counter stainless drawer refrigerator; Moen touchless faucet; asymmetric hexagonal backsplash tile. Pantry cabinets: Thomasville upper cabinets (12-inch deep) mounted vertically. Open shelving: solid oak at 220 grit with Simple Finish by Maker Brand; oak 1×2 trim as picture frame surround.
Countertop installation tip: Make a Luan plywood template with a hot glue gun first — take the template to the countertop fabricator rather than trying to measure the space precisely. Use suction cup handles for lifting heavy quartz slabs.
Walk-Through Bathroom Design
The bathroom in the main 40-foot container is a walk-through design — connecting the kitchen and bedroom without wasting space on a hallway. The 7-foot container width forced several unusual decisions: narrow vanity, mirrored cabinet with sliding drawers, and a Moen smart shower system. Tile: complete wall hex tile throughout on cement board substrate, with Red Guard waterproofing membrane. Grout: Fusion Pro premixed "Bright White." Flooring transition: engineered wood flooring into the bedroom, with Ryobi multi-tool plunge cuts for trim work.
How to Build a Rooftop Deck on a Shipping Container
The container roof is NOT designed for foot traffic
A container's strength is concentrated in its four corner posts and the top and bottom side rails. The roof panel itself is relatively thin corrugated steel designed for weather resistance, not structural loading. Walking directly on an unmodified container roof causes flexing, denting, and noise. In wet conditions it is extremely slippery. A proper rooftop deck requires a framed sub-structure that transfers deck loads to the container's structural points — not to the roof panel.
Step-by-step rooftop deck construction
-
1
Waterproof the container roof first
Clean, remove rust, and apply a waterproof membrane system — liquid-applied membrane, EPDM sheet, or TPO roofing — over the entire roof surface and all seams. This must be completed before any framing is installed on top. If the membrane fails later, it's extremely difficult to access under a finished deck.
-
2
Design the sub-frame to load corner castings and side rails
The sub-frame must transfer all loads to the container's structural points — never to the roof panel mid-span. Two common approaches: welded steel angle or square tube beams spanning between corner castings; or non-welded Domino Clamp-style attachments (no welding or drilling required). The frame must maintain the roof's slope-to-drain direction.
-
3
Install sub-frame and secondary joists
Weld or clamp primary beams to the corner castings and top side rails. Secondary joists span between primary beams at spacing appropriate for the decking material. All framing must be galvanized or coated — it will be exposed to weather throughout the deck's lifespan even after decking is installed.
-
4
Install composite decking
Composite decking is the most common choice for container rooftop decks — UV resistant, moisture resistant, splinter-free. In desert and hot climates: choose light grey, tan, or white composite. Dark composite in direct desert sun can reach 130–160°F — barefoot-hostile. Hidden fasteners provide a cleaner look; surface screws are easier to install and replace.
-
5
Install perimeter railings
Posts bolted through the decking and into the sub-frame (structural), not into the container roof panel. Rails and balusters at code-required height (typically 36 inches for decks under 30 inches height, 42 inches above). In dark-sky locations like Joshua Tree, minimize railing height to code minimum — lower railings preserve the view and open sky.
-
6
Staircase access
The stair base must bear on the ground or a structural support — not on the container roof panel. A landing platform at the top integrates with the deck framing. Spiral stairs are space-efficient for container rooftop access; straight stairs require more footprint but are more comfortable for regular use.
-
7
Desert-specific considerations
Shade structure is critical — without shade, a Joshua Tree rooftop deck is usable only in the early morning and evening during summer. An air gap between the container roof membrane and the underside of the deck framing allows convective cooling. For stargazing (Joshua Tree is a designated Dark Sky Community), minimize permanent overhead structures and use warm-tone LED lighting to preserve night vision.
Ben's 7 Key Lessons — Verbatim
-
1
Container homes are not cheaper than conventional builds if you hire out
"Unless you're going to build it yourself, it's probably going to be about 15 to 20% more expensive than conventional building methods. So please don't buy this if you think it's going to be a miracle solution to your housing problems."
-
2
Go slow on the first cut — document your lines carefully
The first container cut is nerve-wracking and the most irreversible step. Mark lines with a silver Sharpie, a level, and a cardboard template. Go slowly. The second cut was significantly better than the first because he slowed down.
-
3
Angle steel frames beat tube steel for window and door openings
Angle steel provides a positive stop, two weld seam locations, and a 3-inch overlap for waterproofing. Tube steel's radius creates a gap at the wall junction that angle steel eliminates.
-
4
In a narrow galley kitchen, spend more on durable cabinets
The cost differential is minimal due to limited quantity, but concentration of use in a small kitchen makes durability critical over the long term.
-
5
Hire professionals for drywall and countertop installation
"An experienced crew is so fast at it and they're going to do a much better job at muddying, taping and sanding than I could. Not only would I be struggling physically with the dexterity for each one of these steps, I'd be overthinking each process as well."
-
6
Grid-tied solar beats off-grid for most container homes with utility access
Off-grid forces you to design for worst-case weather and peak occupancy simultaneously — a very expensive combination. Grid-tied uses the utility as a free battery, letting you size the solar system for average production rather than worst-case demand.
-
7
The engineer's stamp is non-negotiable — common sense is not enough
"It doesn't matter how smart you think you are — if you don't have an engineer's stamp, you can't build it." A permitted build requires calculations, not intuition. The structural requirements that look excessive to DIY commenters are the engineer's minimum code-compliant solution.
Full Documented Cost Breakdown
| Item | Cost | Notes |
|---|---|---|
| 10-acre lot, Joshua Tree | $20,000 | Negotiated from $24,000 asking price |
| Topographical survey and plot plan | $4,000 | Required first step for setback determination |
| Architectural drawings | $5,000 | ZeroEnergy Design; drawing set for permitting |
| 2× 40-ft high-cube containers (one-trip) | $9,600 | $4,800 each, Container Discounts |
| 1× 20-ft high-cube container (one-trip) | $3,250 | Container Discounts |
| Fire sprinkler system | $7,000+ | San Bernardino County mandate; "avoidable in states with less strict regulations" |
| Septic system (above-ground planters) | $8,000 | 1,500-gal tank + 4× 1,000-gal planters + pump and piping |
| Utility connection (electric + water) | ~$20,000 | "Almost as much as I paid for the land itself" — transformer, conduit trench, meter fees, backflow |
| General contractor (time and materials) | Not specified | Recommended over fixed-price for unconventional owner-involved builds |
| Structural engineering | Not specified | Required; includes earthquake anchor calculations and stamp |
Ben does not publish a total all-in cost figure for the complete build. The documented hard costs above total approximately $77,000+, not including structural engineering, GC labor, HVAC, kitchen, bathroom, rooftop deck, or interior finishes. This is consistent with his stated observation that owner-built container homes cost roughly the same as conventional construction, and contractor-built container homes cost 15–20% more.
Sources for this case study:
- The Modern Home Project — "Man Builds a Dream Container House in the Middle of the Desert | Full Build" (YouTube ID: XK7OXPgs9ZM, April 17, 2026)
- The Modern Home Project — "How to Build a Rooftop Deck on your Shipping Container | EP 06" (YouTube ID: XX9QxydpyRU, October 15, 2024)
- themodernhomeproject.com/process — Verbatim transcripts, Episodes 1–8
- themodernhomeproject.com/about — Creator biography and firm background
- Cost data and regional analysis: ContainerCompass
Starting your own build?
Shipped.com supplies one-trip high-cube containers across the US with delivery included — the same spec Ben used for his Joshua Tree build.
Get container quotes →